Recycle Your Pots For a Fundraiser

Recycle Pots

Edible San Marcos is working on a fundraiser and we can use your help.  We can use your old pots from vegetables and flowers.  This will help in two ways. First off it will keep them out of the landfill and second we will be reusing them.

If you want to wash them out first in a 10 percent bleach solution that would be wonderful.  If not that is fine too.

You can bring the pots to the monthly meeting or to the community garden.  Just email us first.   Or we can meet you at a coffee shop or at your house.  Just email us at ediblesanmarcos@gmail.com and let us know what would work for you.  If you are interested in helping us raise plants let us know.  You can be part of the fundraiser in other Ways too!

Seed To Table – Onions

Onions

Onions

History

The history of onion is one that is so unclear as wild onions have been growing for centuries. Most archeologists agree that bulb onions originated in central Asia.

One thing that we can say for certain is that onions have been cultivated for over 5000 years.  In 3500 B.C. there were onions growing in Chinese gardens. In 2500 B.C. there was a Sumerian text text that told of a person plowing over the governor’s onion patch.

Onions were used as an object of worship in Egypt as they symbolized eternity. Why an onion you may ask.  It was because of the structure of an onion being a circle within a circle. The onions were painted in pyramids and used at banquet tables as well.

Indians, Greeks and Romans alike all used onions for its medicinal values.  Some may have gone a little too far, such as the Greeks by rubbing their bodies down in onion juice before competition. They probably chased the competition away with the smell!

The Romans brought the onions to England and Germany. From England the bulb onions came to America.  Bulb onions were planted in America in 1648. However the Native American Indians were eating wild onions called ramps.

Cultivation

What you see on top is what is happening below. For each leaf on the onion plant there is a ring of onion below.  The larger the leaf is the larger the onion ring is!  Onions form tops first and depending on the variety they then form bulbs.

Onion sets are actual onion bulbs that have reached one inch in diameter and then have been pulled to stop growing.  Onion transplants are onions that have been growing about 2 months

There are two different varieties of onions, short day varieties and long day varieties.  Long Day Varieties are for the North(North of the 36th Parallel) and start forming the bulbs when the day length reaches 14 to 16 hours. Short Day varieties are for the South and start to bulb when the day length reaches 10 to 12 hours.

There are other varieties of onions that you can grow to add variety to your dishes.

Egyptian Walking Onions Produce a small bunching onion on the bottom and a  small onion on the top that falls over and walks.

Potato Onions are a bunching onion that is a larger than a bunching onion  or a shallot and produces a hill of onions.

Shallots are a bit more pungent and divide, they also like a drier environment.

Bunching Onions produce a large green top and a small shallot on the bottom.  The beauty of bunching onions is that they produce nice fresh green onions in the winter and spring time while you are waiting for your main crop of onions to come into fruition.

Onions prefer a soil Ph that is between 6.2 and 6.8.

Beans and peas do not like onions so beware of that when you are planning your garden.

You need to choose a sunny location to grow onions. Plan your rows the same direction as the prevailing wind to prevent diseases. This will help you keep your onions aired out the natural way.  Onions need fertilizer when you plant them. They like fertilizer with a high phosphorus content.  It is good to add one inch of well rotted compost as well.  Other good sources of amendments are Gypsum which add calcium and sulphur and loosen the soil.  Colloidal phosphate adds phosphorus  and calcium which is needed for good root structure. Greensand or granite meal are good sources of potassium. Dig a trench that is 4” deep. Put the fertilizer in the trench and then cover with 2 inches of soil. Plant the onions 1” deep and 4” apart. Water well.  You need to fertilize again 3 weeks after planting, and again 2 to 3 weeks later. Continue watering and feeding the onions as they have a very shallow root system.  When the neck starts to feel soft, and the ground starts to crack and the bulbs start to form hold back on the water and on the fertilizer.

Cultivate regularly to keep the weeds at bay as they will hinder growth.  Remember that the onions roots are shallow so be very careful. Do not cover the onion bulb with soil or it will hinder bulb formation.

Covering the ground with mulch or straw can help to retain moisture and prevent weeds as well.

Harvesting

Harvest the onion when the tops turn yellow or brown and fall over.  Pull the onions and let cure for 2 days in the field. Make sure when you pull your onions that they are not in the scorching sun or they will get sunscald.  There is a method called shingling that is used to prevent sunscald. When you pull your onions make a windrow.  Then take the tops of one row to cover the next. You can also dry them under a shady tree or in the garage.  Drying in either of these methods will take a few days longer but you will not get sunscald and hence you will not be open to a host of  other fungal diseases. Bring them in and let them dry fully on screens.  Once dry clip the top and the roots to 1 inch. Store the onions in a mesh bag or wrapped in aluminum foil in the refrigerator.

I have compiled a complete list of diseases and insect that can attack your crop of onions.  There are links to follow so you can see pictures and read about the various diseases.  If I would have written about them all this would have been the longest onion article in history and you would have been bored out of your mind! So use this as a reference if you get in trouble.  Remember to rotate your crops.  I can never say it enough and I know you may be tired of hearing it.

Diseases

Purple Blotch – Purple lesions on the leaves

Blue Mold

Downy Mildew

Bacterial Soft Rot

Basal Plate Rot

Botrytis Bulb Rot

Black Mold

Dodder

Mushy Rot

Neck Rot

Onion Rust

Pink Root

Smudge

Powdery Mildew

Smut

Sour Skin

Southern Blight

Stemphylium Leaf Blight

Sunscald

White Rot

Tip Blight

Insects

Onion Thrip – A sucking insect that rasps the leaves. Thrips cause the onion leaves to turn grey. Thrips look like dark or yellow specks.  Use insecticidal soap.

Onion Maggots

Root Knot Nematode

Lesion Nematode

Stem and Bulb Nematode

Garden Springtail

Lesser Bulb Fly

Onion Recipes

http://recipes.lovetoknow.com/wiki/Category:Onion_Recipes

http://aggie-horticulture.tamu.edu/archives/parsons/publications/onions/onionrecipes.html


Seed to Table – Kale

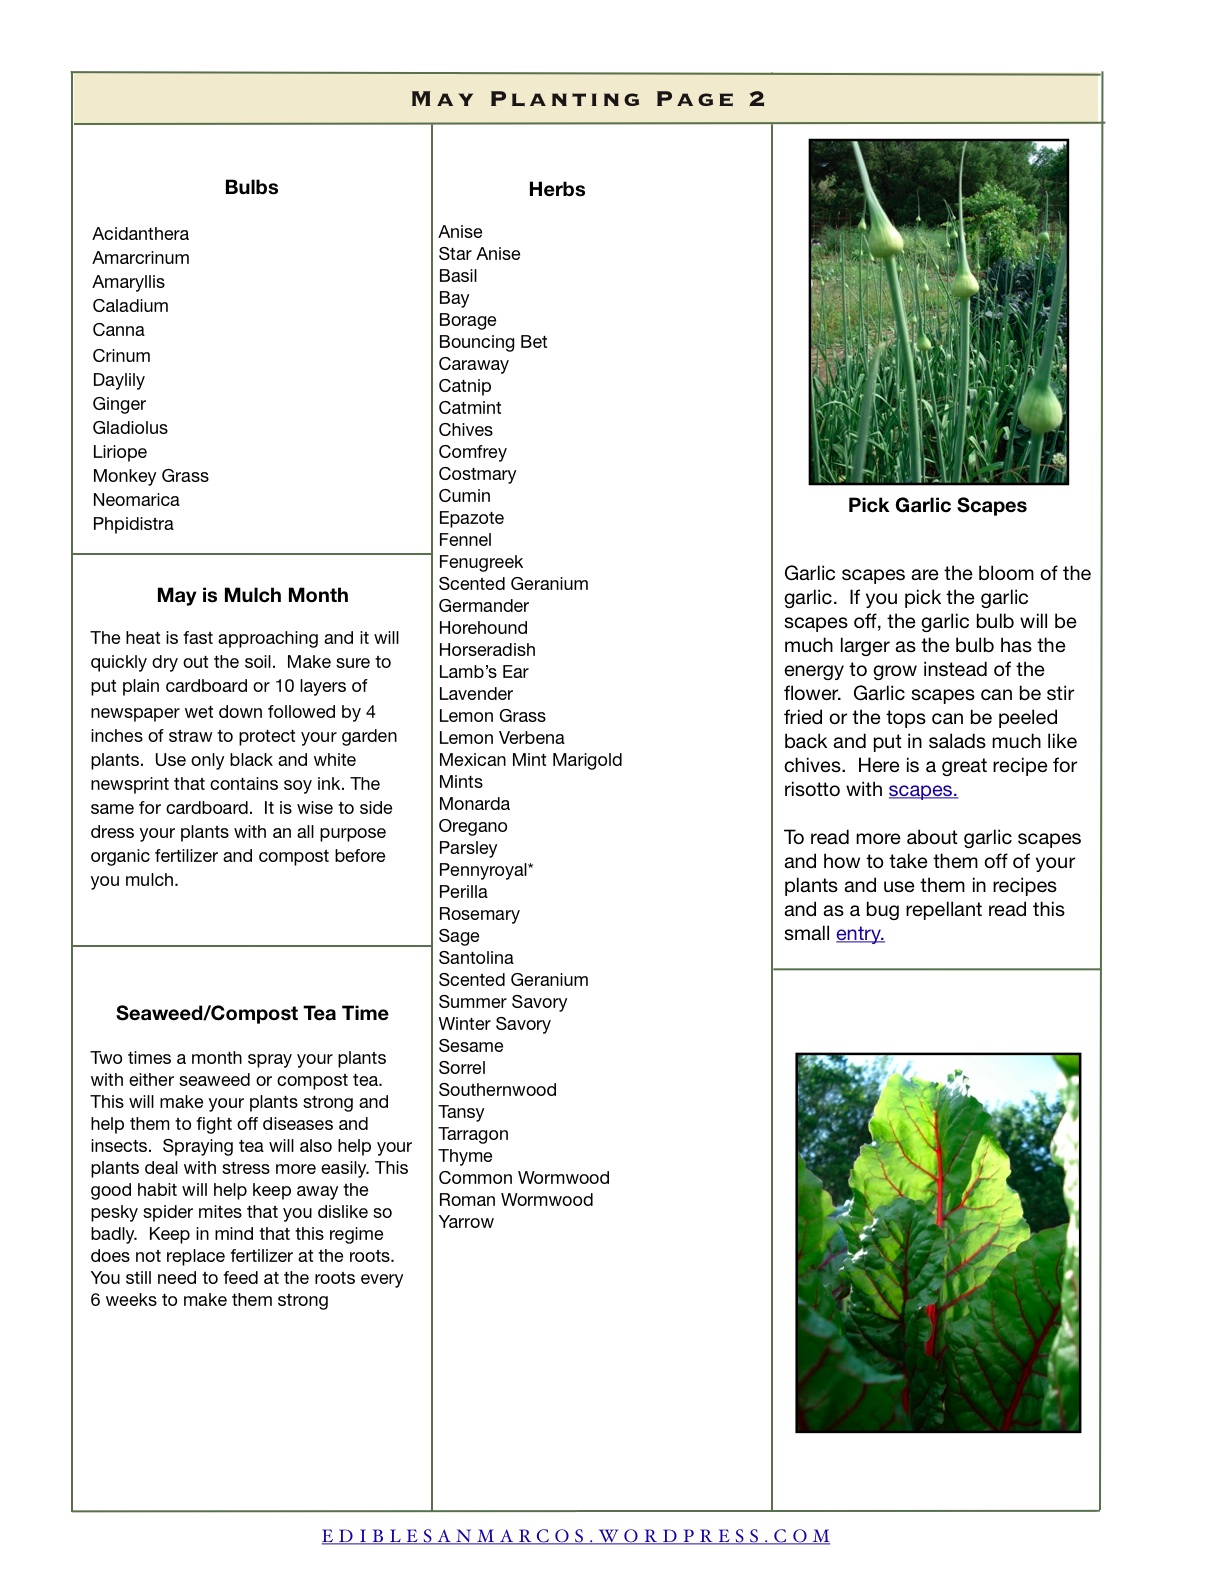
Kale is a superfood packed with nutrition.  Vegans are very familiar  with it because it supplies great amounts of calcium, magnesium and b vitamins that they are lack from consuming dairy products.  Whole food vitamins are made with kale as the have a storehouse of nutrients ranging from Protein, Thiamin, Riboflavin, Folate, Iron, Magnesium and Phosphorus, and a very good source of Vitamin A, Vitamin C, Vitamin K, Vitamin B6, Calcium, Potassium, Copper and Manganese. It is very complete on the amino acid scale as well.  In kale there are Isothiocyanates (ITCs) made from glucosinolates, these are healthy little guys that block cancer causing disease from attacking us.  It has been shown that kale has been an effective against 5 different types of cancer.  To read more about this follow this wonderful link.  One more amazing fact about kale is that it has the highest concentration of xanthophyll carotenoids lutein and zeaxanthin out of all the vegetables.  That is great news for your eyes.  It is like sunscreen for kale and it helps protect your eyes from cataracts and macular degeneration.  Wow, just one more reason to eat kale!

History

Now, for a little history on our friendly healer.  It is said that kale was brought to Europe by around 600 BC by Celtic travelers. Kale was brought to the US by English settlers in the 17th century.   Kale is actually a descendant of wild cabbage, which is in the cruciferae family. You are fond of many other vegetables in this family such as brussel sprouts, cabbage, broccoli, cauliflower, collards, and kale. There are two species of kale; Brassica napus includes such kale as Siberian kale and Red  and White Russian kale and they are of the Pabularia group.  These kale are frilly and softer than the Brassica oleraceae group.  Those in the latter group include collards and Dinosaur kale. Dinosaur kale was discovered in italy in the late 19th century and has become very popular.  Kale is a cool weather crop. Kale tastes better in the winter because the cold nights turn the starch into sugar in the leaves making them sweet.  So when the nights start dipping down into the 40’s start running out and harvesting your kale and it will be sweet!    That is why collards or dinosaur kale form the group Brassica Oleraceae are grown in the south in the summer more palatable than kale of the Brassica napus group.

Let me interject one very important thing about harvesting greens of any kind.  This is the most important thing you will ever read, especially when it comes to harvesting greens in the summer.  you must harvest your greens early in the morning when it is cool.  I am sorry if you are not a morning person, I didn’t mean to ruin your day!  Let me explain why and it will make perfect sense.  There are bitter oils in the plants and they stay in they stems at night as the day progresses they go from the stems into the leaves of the plants.  This will turn your kale, chard , lettuce and other greens bitter more and more as the day goes on. So we go back to that age old phrase “the early bird catches the worm!” If you practice this you will find your greens much sweeter. It is like harvesting an entirely different plant!

Growing Conditions

Plant about 4 plants of kale for the average person. Kale likes a PH between  5.5-6.5   Kale is a very heavy feeder.  Make sure to incorporate a lot of compost and fertilizer before you plant kale, as it will be in the ground for a long time.  Make sure to put it in a spot where you don’t want to move it.  I once had kale in the ground for 5 1/2 years, they were wise old plants. It takes 5-10 days for kale to germinate at it’s optimal soil temperature of  70 to 75 degrees. Mid January and Mid August are going to be your direct seeding or seed starting times for kale.

We have two seasons here as kale does not like the heat.  It will limp along in the summer though.   Plant kale 1/4 to 1/2 inch deep, with a spacing of 12 to 18 inches apart. It is important to have room between plants so you have plenty of air circulation and do not get whiteflies in the fall. Keep the ground moist while you are waiting for the seeds to sprout.  Kale only takes about 60 days before it is ready to eat once it is planted. Companion Plants for kale are Dill, Garbanzo, Garlic, Hyssop, Onion, Marigold, Mint, Nasturtium, Sage, Pennyroyal, Wormwood, Thyme, Radish, Southernwood, Celery, Peppermint, Beets, and Chamomile.   Kale dislikes Mustard, Tomato, Pepper, Eggplant, Nightshades, Strawberries, and Pole Beans.

Make sure to give your kale a side dressing of compost or an organic fertilizer every month as it is a heavy feeder.  It will also benefit from seaweed tea once and awhile.  I strongly suggest giving your kale side dressing of  amendments with calcium and magnesium as they are heavy feeders and they will produce more and stay in the ground longer, hence the kale that I had that lasted 5 years. Here is a good break down of some amendments to help you.  Ellen at Garden-Ville will always be glad to help you if you are confused, just go in and talk to her. She is as sweet as pie!   A good source of magnesium and sulfur is Epsom Salts,  Greensand  supplies magnesium as well as potash, iron and 30 trace minerals and loosens clay soils, gypsum delivers calcium without raising the soil ph.

Insects and Diseases

These are the common insects and diseases that effect kale.  There are links to some of these  on our web site.

Diseases

Damping-Off Disease A soil-borne fungus that affects both seeds and young transplants.Do not keep the soil too wet when seedlings are young.

Downy Mildew A disease that is caused by a fungus Peronospora parasitica attacks both seedlings and mature plants.

Alternaria Leaf Spot This fungus is frequent during warm moist conditions and is caused by Alternaria species.

Black Rot is caused by a bacterium, Xanthomonas campestris pathovar campestris.

Black Leg is caused by the fungus, Phoma lingam.

Wirestem is caused by the fungus, Rhizoctonia solani.

Fusarium Yellows A fungus that causes the leaves to turn yellow and die.

Clubroot a fungus that attacks the root of the crops.

Bacterial Soft Rot Healthy plants are the first line of defense.  Many times the plants are stressed or either drought stricken.

Turnip Mosaic Virus(TuMV) a Potyvirus spread by aphids.

Cauliflower mosaic virus(CaMV) one of the Pararetroviruses.

Insects

Aphids follow our link

Cabbage Looper follow our link

Cutworm use Bt

Flea Beetles follow our link

Harlequin Bugs follow our link

Whiteflies follow our link

Seed Saving

To save seed you must isolate your kale 1/4 mile from any other members of the brassicas family. Tree lines, wood lots and buildings may be used to separate varieties. Harvest after the kale has flowered and the seed pods have dried and the seeds have become black. Be careful as the pods will shatter easily.

Cooking

Try kale raw in salads, braised, sautéed, boiled or steamed.

My favorite way to make kale is kale chips, I make them every week, sometimes twice a week because they are such a hit with my friends, click here for the recipe.

Kale Recipes uk, mariquita, kale

Carrots- Seed to Table

Carrots in my house are one of the essential ingredients to cooking anything good.  They are so versatile I seem to cook them in anything, even in eggs.  Yes, I did say eggs.  The next time you are cooking up an omelet, while cooking your green peppers, onions, tomatoes and garlic toss a few carrot slices thinly and you will be surprised at how the sweet flavor adds a yummy touch of splendor to your eggs.  Of course I am the kind of cook that throws in the pot whatever I have in the garden.  Could you imagine soup without carrots?  Of course it seems carrots are always in the garden, as we have two good growing seasons in Central Texas.  Carrots are also a great keeper in the fridge.  They also dehydrate, freeze and can well. So won’t you try growing some today.

Growing Conditions

Carrots love cool weather.  As a matter of fact they are one of the crops that you can throw in the ground as soon as it can be worked.  They only take about 65 to 75 days to mature depending on the variety that you plant. The optimal temperature for carrots is between 60 and 70 degrees.  Carrots prefer a Ph between 6.0 and 6.8. Carrots demand an ample amount of moisture.  If you do not supply them with an ample amount of moisture they will be woody.  On the other hand when the temperatures dip below 55 degrees for extended periods of time the carrots will turn pale in color and just get longer and skinnier.  You will notice the carrots at the farmers markets in the spring are paler in color as they have been in the ground over the winter!

Companion plants for carrots are radish, peas, sage, lettuce, onions, leeks, rosemary, wormwood, tomatoes, marigolds, and scorzonera.

Do not grow carrots near fruit or nut trees, grapes,dill and parsnips.

Planting your carrots along with radishes help to mark your carrots and suppress the weeds.

Try planting two or three rows and mulching it with newspaper and straw in between the rows to keep out the weeds.

You want to make sure that the area you are planting your carrots in is free of stones and debris or your carrots will end up forked or misshapen.  Carrots do not like heavy or clay soils.  If you have heavy or clay soils it is good to mix a good amount of compost in with the soil to lighten it up.  Carrots also grow well in raised beds.  Wherever you are growing these tasty morsels make sure to dig your beds deeply first so that the carrots will be able to reach down deep and grow deep roots, because after all that is what the carrot is!

Mix a low nitrogen fertilizer in with the soil before planting the seeds.  Always use a low nitrogen fertilizer or the roots of the carrots will develop fine little hairs. Plant the carrot seeds 1/4 inch deep, and about 2 inches apart and then use a watering can to water them in.  Keep the soil moist for the seeds to germinate.  Don’t loose heart, they may take 10 days or longer to germinate.  Fertilize again when the carrots are three to four inches and once again when the carrots are six to eight inches tall.

When the shoulders of the carrots become exposed cover them up with soil so they do not turn green.

When your carrots are mature loosen the soil with a digging fork so you do not break the roots.  The lift or pull them out.  Be careful not to leave them in them in the ground too long as there are many bugs that like to eat these tasty morsels just as much as you do! You can leave summer sown carrots in the ground longer if you remove them before it freezes.

History

Amazingly enough our first carrot was purple! And it originated in Afghanistan about 5000 years ago. In the 1500’s the mutant yellow carrots were bread to form the wonderful sweet orange carrots that we know today.  by the 1600’s carrots came to north america.

Varieties

There are five main varieties of carrots here in North America.  Of course there is species crossover, however I will cover the basics.

Nantes – Sweet and crisp 5-7 inch roots . Does not store well. Loose, sandy soil or raised beds. 55-70 days in spring; 60-75 in fall

Chantenay – Rich sweet flavor, stores well. broad shoulders and rounded tips.  clay soil or fertile loam. 55-70 days in spring; 70-110 in fall

Imperator -Slightly fibrous texture, long tapered roots with stocky shoulders, stores well. deep sandy loam. 55-100 days in spring, 80-110 in fall.

Danvers– Shorter and stockier, may have yellow core, stores well, good for juicing. Deep sandy loam. 55-100 days in spring, 80-110 in fall.

Baby & Miniature – Sweet roots are less than 5 inches long, round, cylindrical or tapered. Does not store well. 50-60 days in spring, 60-70 in fall.

Pests and Diseases

Leafhoppers plant feeding insects from the family Cicadellidae.

Wireworms – beneficial nematodes and garlic extract are your cures for these feisty little critters.

Carrot Rust Worm Larvae – Do not leave in the ground too long or the carrots will be exposed to carrot rust worm larvae. Use floating row covers.

Aster Yellow –A viral disease caused by insects, primarily the aster leafhopper. There is no cure for the aster yellows so destroy your plant if you have this disease.

Leaf Spot – A bacterial disease treat seeds at 122o F for 25 minutes.

Soft Rot – A bacterial disease that causes soft watery decay.

Root Knot Nematodes -Interplanting your carrots with a lot of marigolds will help prevent the attack from root know nematodes.  It also helps to add diatomaceous  earth to the soil and mix in well at planting time.

Cooking

Of course you have enjoyed carrots raw and enjoyed their sweet flavor.  For and extra special treat try juicing them, the drink is super sweet and delicious.  If you like it a little more savory, juice it with greens and add some tomatoes for added flavor.

Carrots are lovely sauteed, pickled, or steamed.  Refrigerator type pickles that are made out of carrots are very good as they are sweet and sour at the same time.

Cucumbers – Seed to Table

Cucumbers are such a cool treat in the hot summer time.  They seem to cool you down, and replenish you. They are very nutritious as well.  They are full of vitamins A, K, Magnesium, Manganese, Potassium, Calcium and Omega 6.

It is not surprising that cucumbers originated in India as they like the heat. This could be one reason that they do so well in Central Texas. They appeared on the scene in North America in the sixteenth century.

Planting Time

First off you need at least 5 hours of sunlight.  Start with good soil emended with well rotted compost and organic fertilizer and sow your seeds 1/2 to 1 inch deep and in rows 5-6 feet apart. The soil temperature should be at least 50 degrees for the seed to germinate.  If the soil is colder, the seed will rot. The optimum soil temperature is 80 degrees. The seed will not germinate in soil over 100 degrees.  Make sure all danger of frost is passed before you plant your cucumbers.  If you want to get a jump on things you can start you seedlings 3 to 4 weeks before the last average frost date.  Be careful to give your seedlings room though, as cucumbers do not like to be crowded.  The middle eastern cucumbers do exceptionally well in our area.

Keeping In Production

1. Once cucumber start vining, fertilize with an organic fertilizer like Lady Bug All Purpose Fertilizer  or Buds and Blooms

2. Mulch cucumbers as the roots are shallow and they should be kept moist.  Don’t overwater though.  Let the soil  dry out on the top in between watering or you will get fungal diseases.

  1. Cucumber do very well when trellised or caged.

Harvesting and Storage

Make sure to pick cucumbers before they turn yellow.  The standard goes as follows 2 inches long for pickling cucumbers, 4-6 inches long for dills, 6-8 inches for slicing cukes and burpless should be 1-1/2 inches in diameter and up to 10 inches long. Watch your vines carefully as they need picking every two days.

Cucumbers fresh off the vine have a very short shelf life of about 3 days. Keep them in a plastic bag or a tupperware container.  The cucumbers in the store have wax on them to make them store longer.  You can rub some fresh beeswax on them to make them last longer if you wish.  The best way to preserve them is to pickle them.

Pests and Diseases

Aphids

Cucumber Beetle

Pickleworm

Serpentine Leafminer

Sharpshooter

Spider Mites

Squash Vine Borer

Whiteflies

Anthracnose

Angular Leafspot

Bacterial Wilt

Cucumber Mosaic Virus

Cottony Leak

Downy Mildew

Powdery Mildew

Root-Knot Nematodes

Scab

more about “The Parsley Worm“, posted with vodpod

January 2010 Newsletter

January is a Busy Month For Your Garden by Suzi Fields

January may seem like a sleepy little month for gardeners from afar but we really have a lot of important things to do this month.  First of all you have to think about your garden last year before you can start planning this year.  Are there vegetables that you really liked that you ran out of that you need to plant more of.  Most gardeners always need to plant more carrots.  Remember that they keep along time in the fridge, and they are so much better form your own garden.  Or did you end of with boatloads of hot peppers and have to give them to the food bank?  Maybe you want to leave a spot open in your garden dedicated to grow just for the food bank.  Next think about new varieties that you want to try.  Also think about things that did not do well and then determine if you just planted them at the wrong time or maybe they are not suited for our climate.  I tried Jicama this year and the plant was lovely but the fruit was a bust.  I will try it one more time just for the novelty.  Spacing can also be an issue you may have tried new varieties that took up more space than you expected.  I tried a new variety of squash that gave me a wheelbarrow full but because we have such a long season it consumed my garden.  It is the best squash ever, so I will give it more space.

Plan Your Garden

Now that you are thinking about what vegetables you want in your garden  and the spacing that you need it is time to plan your garden.  If you didn’t keep a journal last year you can still probably remember where things were in the garden so that you can write it down.  It is important to rotate your crops so that you do not have the same pests plague your crops all over again. Draw out a new diagram for this year, it should be a little easier starting with a clean slate and remembering how things went last year.

Order Seeds

We have a great list of organic seed resources on our website, to help you out. EdibleSanMarcos.wordpress.com it is important that you start out with good organic seeds, so that you have healthy strong plants. Don’t forget about seed swaps, they are a great way to exchange seeds with out spending money.  We will be having a seed swap on January 21 from 7-8:30 PM at the San Marcos Public Library in the large meeting room.  It is the first room on the left when you walk in the doors.

Clean Up Garden Debris

If you haven’t had a chance to clean up your garden, do it now.  Debris in the garden harbors insects.  They love to hide under leaves, rocks, twigs, straw, weeds and any other protection they can get under.  So get out there on one of these beautiful days rake out your garden pull up the dead plants and compost it.

Start Tomatoes and Peppers

That is right, it is time to start your tomatoes, peppers and eggplants inside if you are starting them from seed.  Use a good seed starting mix and put them under grow light or a sunny window.

Prune Fruit Trees, Grapes, and Bushes

This needs to be done while the plant is dormant and the sap is running slow.  If you just planted them this year do not prune them though.

Spray Fruit Trees With Dormant Oil This is part of keeping them healthy and keeping scale and other insects off of them.

Plant Fruit Trees, Grapes, Strawberries and Pecan Trees

It is still time to get your fruit in the ground so get it planted to enjoy the fruit that you love so much.

Fertilize Asparagus and Strawberries

It is the time of year that they need food to get ready to produce a great crop for you to enjoy!

Plant Some Winter Crops

We actually have a lot of vegetables that we can plant as of the 15th of this month.  I urge you to try to get a few in the ground.  Fresh vegetables are so welcome.  Especially when it is so cold outside it is nice to eat something fresh from your garden.

Well, you thought you had a month off, but there is much to be done.  Don’t forget to clean and sharpen your garden tools. And plant some flowers.